
Screenshot! For genealogy research, what is the best way to screen shot records on the computer for future printing, deciphering or study, and for zooming in? Well, fortunately, after screen shooting a dozen records, I discovered, there’s a good way and a poor-quality way to do it. Let me explain . . .
How many times have I needed a copy of a record for my genealogical research? Many times, especially in this digital age! I needed to take a simple photo of a record, or page of a book, that I wanted to be able to decipher the gothic lettering at a later date, or to use to attach to my family tree. I didn’t know if I’d be able to find that record again, so originally I copied and pasted links from the http:// and put them in a word document with the description of what I was searching for or what I found in that particular document. But later, when I had time to dive into this document to research, the webpage links would give me a a 404 error! After hours of searching, I didn’t want to lose that information again. I needed a hard copy!
In many records on-line, you’re not able to highlight the screen and copy. Or right click and save as a picture or image. Or even Control+C to copy, what you see on the screen. If you can, then you will get the same image quality that you see of the image on the screen. But there are many times, these functions don’t work. So, I began taking screen shots of my computer screen, labeling the photo with what I was searching for in the record. I am a detailed labeler! Haha! Too many pieces going on in my head when researching. So, I must label everything 😊 as to not forget why I needed that document, or what I needed to look for or verify in the document.
It wasn’t until I pulled those screen shots back up to have a closer look and study them, that I realized, the copy of the screen shot was worse than the actual image showing up on my screen. How could that be? And what a lot of work wasted! I had to go back and re-research, hoping I’d find those exact document or records, all over again!
How do I prevent this from happening to me?
SHORT ANSWER
The VERY short answer is, well, . . . it depends! HAHA! It all depends on the Display Resolution of the screen on your phone, tablet or computer. But, if going out and getting a new high-resolution computer, laptop or phone screen/monitor, just to take screenshots, is NOT an option, then see my test results below. If it is an option, keep reading.
My 27-inch display’s resolution is full HD-High Definition (1920 x 1080) , which is a standard resolution and size for most computer monitors out there. But this resolution only gives you about a 75KB screenshot image, which is a poor-quality image, and is the reason I began trying to figure out HOW to get a better-quality screenshot! Pixel density is important too. At the standard resolution you only get around 81ppi (pixels per inch). So, if you want to stay with a 1080p then get a smaller screen. Then your PPI will go to a higher density or better quality. The next resolution size up is a 16:9 ratio called a Wide Quad HD 2560 x 1440p (progressive scan – how a picture is drawn on the computer – too technical for me 😊 just know a “p” is better than an “i”). That is 78% more pixels per inch on the same size screen and gives you about 108ppi for a 27inch monitor screen. According to experts (I did a LOT of reading) that’s a sweet spot! It’s also what newer phones have for their screen resolution — 1440p. 4K is the leading monitor for high-resolution, but it can be overkill for meeting screen shooting needs, but once again is better than WQHD, and is also more expensive and most would have to upgrade to a more powerful GPU (I think they are referring to the graphics card in your hard drive) or Pentium i7 processor. What it really comes down to according to a MAC expert. The higher the resolution on the screen and the higher the graphics card quality. The better the screen shot. So whatever that entails for you, and your needs for what you are trying to accomplish with genealogical research and sourcing, and your budget, you’ll have to figure out what’s best for you. I upgraded to a WQHD and it was much better, but I still wasn’t satisfied. So I returned it and just got a 4K. It still is not as perfect as my 5K Mac. But it is close enough that I can do a Windows+Print Screen in one step, label the photo and have enough great quality to study it later and read that pesky Gothic Lettering. (See Reading Gothic Lettering for help in this area!)
FIND OUT YOUR COMPUTER SCREEN RESOLUTION
Use this link to find out your computer (Mac or PC) screen resolution is: https://www.designrush.com/trends/what-is-my-screen-resolution Or see instructions below.
How do I check my dpi, or resolution setting, on Windows 10?
Right click on an empty area on your desktop and select Display. In System, settings screen click on Display option from left side. Under Change the size of text, apps, and other items: 100% (Recommended), move the slider left or right to the DPI percentage you want to set for that display. Or under Display resolution, choose the largest set of DPI (example 1920×1080) setting.
Of the documents I screenshot, using my Mac, which has a 1440p resolution on a 28-inch screen (I’m estimating on the screen dimensions), the image quality was far superior to anything I’ve been able to produce on my PC with a 1080p screen resolution. The screenshot on the 1440p was a 12.7MB PNG and, after conversion, the jpeg was 7.6MB. That is a really great quality photo!
TEST RESULTS
So… after some research and lots of experimenting and documenting my results, I learned what to do and what not to do, what gives the best resolution of a genealogy book or record when taking a screenshot and what does not! If you have a 1080p computer monitor at 27 inch or larger. Here are my results:
Go to end of this post for MAC section below to see best practices for taking a screenshot on a Mac
Read PC section below to see best practices for taking a screenshot in Windows 10:
NOT Snipping tool: If you want an image cropped on the spot with less steps involved and automatically saved as a JPEG. Then this is a great tool. The Problem! You’ll find a very poor-quality photo when you go to look at it again — around a 125KB jpeg. Yes, you can place it in folder and label, but you cannot enlarge or see it without digital pixilation. Depending on image quality of the site you take a screenshot of, the image will be same size or smaller, but you cannot zoom or increase quality.
NOT Windows + print Screen (prt scr): You can visually see your screen go dark as it takes a picture of your entire computer screen. You cannot crop the photo till later in another program. The image is saved as a PNG (NOT a JPG) and ends up being about 1.40MB in size. Image quality was still poor because it’s a PNG. You can convert and crop this type of screenshot in “Paint” or “Microsoft Office” or “Adobe photoshop” and turn it into a JPG. I’ve used all three – but your image quality will stay the same. It cannot be improved.
File size matters. For example, a PNG file of equal size to a JPG file is actually worse resolution than the JPG file.Said another way, a 127KB jpg file is actually equal in quality to a 1.39MB (1,390 kb) png. But the photo side by side looks exactly the same. (an example here would seem silly because they look identical.)
After you take a screenshot using (windows+ prt scr), you can find that image in “Screenshots” under your “pictures tab under This PC” OR under “Windows 10 (C:),” Users, Name, pictures, screenshots. This sometimes works and sometimes doesn’t show up. I have had to hover over the “file folder” in the bottom left tool bar of your computer screen and right click. Up pops a menu and “frequent” and there you will see “screenshot”. Click on it and it will take you to Windows 10 (C:). After this occurs, THEN you will be able to find “screenshot” in the “windows 10 (C:)” section AND the pictures folder under “this PC”. It’s odd. But I spent hours researching how to find screenshots. So just save yourself some frustration. 😊

NOT Control + C (Ctrl + letter C): As mentioned above, a simple Ctrl+C, by itself, doesn’t work to copy images (like photos, book pages, etc.) from many websites. When Ctrl+C does work, it takes an image of an active screen in your browser (That means it only copies the picture on the internet screen you have currently open in your TAB. It does NOT take a copy of your whole computer screen). That is nice, but it is still not cropped because it will include other information you may not want in that image. However, this type of screenshot has no place to go. To save as a screenshot you next press Ctrl+S, which creates an HTML file. This would still be poor quality and would still need to be converted to JPG/PDF. Another choice is to paste it into a program. Two options: 1st paste or, Control+V, into window’s “Paint” program and save as a PNG or JPEG. The quality is similar to that of a screenshot using the “snipping-tool”. Or a 2nd option is to Ctrl+V into a word document. It has ok quality but not as good as what I’m going to show you next . . .
BEST screenshot option!
Best: Alt+ Print Screen (prt scr): This copies the browser image, not your whole computer screen and is the best I’ve found, so far, for saving an image that you will be able to zoom in to see it at a higher resolution later. However, there is a catch! That file also doesn’t show up in screenshots under photos unless you press Ctrl+S, but that gives you a poor-quality screenshot too. To get the resolution or quality we are looking for, it needs a place to be pasted. There are 3 options for pasting the image:

- Paste in to “Paint” on windows and save as a jpeg or png. The image quality remains the same regardless of save type (png or jpeg), but this is the highest quality so far compared to using the Snipping Tool or Windows+Print Screen, or Ctrl+S. But still not fabulous.
- Adobe Photoshop. This is the second-best option. After you Alt+prt scr, open Adobe Photoshop, click File, click New and up comes 2 options; “blank file” or “image from clipboard”. Click on the image from clipboard and your image will show up in the correct dimensions of the screenshot you took. However, if you save the image as a jpeg even with maximum quality, it’s still not great. You still get a pixilated image if you try to zoom in after you’ve converted it to a jpg. So, enlarge the image to exactly what you want to see and crop it so you don’t need to zoom when you want to study it. If you want an image of a whole page in a book, than converting it to a jpg in Photoshop won’t work. So, another way to save the image in Photoshop is as a PSD or Photoshop image, then you can go back into Photoshop and zoom, crop, and save each piece of an image when you need to see something within that image as a jpeg. It’s a pretty great image that is saved, however you choose to crop it, but you just can’t zoom in on it. Although I use adobe a lot, it’s not an ideal way to save, document, and label the information you are searching for.
- The best option! Paste into a Word Document. This is the way I’ve decided to save photos for future documentation. Until I can get a higher resolution computer monitor. Using the Alt+Prt Scrn I paste it into a Word Document, and it maintains the high-resolution. There are 3 ways to paste into a word document. 1- Ctrl+V, 2- right click and save as picture, 3- right click and save as source formatting. I have not discovered a quality difference in any of the 3 ways to paste. They each look the same, react the same, no matter which technique I use to zoom in on the image, they are the same. Even after you’ve cropped and saved the document in Word, it keeps that ability to zoom in and see details. Nice! It’s not ideal to attach a word document, instead of a photo, to a family tree, but it works. There are 2 ways to zoom. 1st by clicking the zoom level at the bottom right side of a word document. It zooms up to 500%. Or you can click on the image and use the photo corners to drag the image and make it larger. Still not ideal, but great quality no matter how much you enlarge the photo.
Although, option #3 is not perfect, what I really like about it, in my opinion, is the ability to document all information about the image right on the page you’ve pasted the image on.

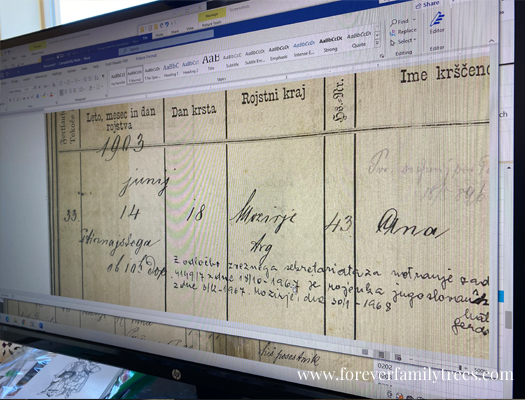
Above is an image using option #3. The quality is so good, you can zoom up close to see the ink flow of those pesky gothic letters. The light and dark of the ink. The photo is clear as what you originally saw on your screen. Now remember, the image is only as good as what you see on the screen.
The HOW to STEPS – FOR BEST RESULTS
So here are the steps for copying your screen, saving, cropping your new “screen photo”, and documenting the photo. A few extra steps, but the benefits of doing it this way are more than getting a poor-quality photo that you can’t see or read later.
First, make sure in your browser, you are zoomed in on what you want in your screenshot. Hint – I try to make my browser (Chrome, Microsoft Edge, Safari, etc.) fill my whole screen.

2. Press ALT + Prt Scr button to capture only the currently active window (above see what my computer window/tab looks like)
3. Next, the only way to see that screenshot, is to copy and paste it into a word document (or CTRL + V). Yep! It’s a pain, but there are really good benefits of doing this, besides the great quality photo you get. (Later on, if you want the photo to just be a photo, see above options. None are great. If you have a better way to store, label, and keep the quality of the photo please share in comments below 😊)

4. Now that the photo has been copied to the word document page, click on the photo. Up pops the sizing bars around the photo and in the top control panel, pops up “Picture Format.” (See above photo red arrows)
5. Now click on “Picture Format” in the top right side and you’ll see CROP. Click on crop and see the thick black bars show up on the photo. Adjust bars to keep only the part of the image you want.

6. Click ENTER (see photo above and result in the photo below)

7. Now that I have the record photographed, saved, cropped, I write above it in my word document; Where the record comes from (the source), the name of the book I found the information in, perhaps the page and date of the document inside the book, and WHO this record is about or helping me to discover. (See example below)

8. Then below the photo, I write what I discovered, what needs to be proven, and even if it is a false lead and proves that this is not my relative. (so annoying to go down the rabbit whole 2x to RE-discover that you knew this person wasn’t part of your family, AGAIN. Ekkk! 😊)

9. I also copy the photo within the word document and paste it below itself. I do this to preserve the original full document. Then with the copied image, I zoom in close to a certain section or word that needs to be studied and crop it. (Above see the word document example). The 1st image above is the record/book I got the information from. The 2nd image is a close up of a name I need to decipher in gothic writing of the town Maria was born in.

10. Also, remember to label the word document when you save it. Keep it consistent. Keep it simple. I put the type of record (BIRTH, marriage, death), then parents first names with a period between them, last name, then daughter or son, and the name of the child. Sometimes I add a year if there are several Maria’s by the same family. The more consistent and very clear, but simple naming of your document, will help you search and find it again.
11. I also make file folders of documents to be verified, to be read or deciphered, or to be translated, if I can’t do it on the spot and need time, then I put a person associated with the document in the title of the word doc. I may have many folders for individuals or families, but they are all under one category so even if I get lazy and forget to drag and drop to a certain file, I know that on my computer all things for my personal family history are under my family history personal file folder. Hence, this is why I LOVE a PC and not MAC.

12. Although not ideal, with a few extra steps needed for organization. Saving your image in a word document using Alt+Prt Scr, is the best for image quality and clearest way to keep those records on your computer for later, more detailed study! And I love the ability to write notes below my documents.
Mac Users
Honestly, I’m not a huge Mac fan, but my husband IS! So, if you have one, they have the easiest solution for turning screenshots from a “png” into a “jpg”. Then I could then email them to my PC where I prefer my organization system.
So, for those MAC users, I wanted to help you too. Here is how to take a screenshot and convert it to a JPG.
Shift+Command+3 for a screenshot of your entire screen.
Or Shift+Command+4 for a screenshot of a section of your screen. Use the mouse to drag a box around the section of the screen you want a photo of.
Now, go to the desktop folder and find the screenshot.
Drag and drop that shot into MAC Photos.
Click on File
Right click export 1 photo
Save as a jpg and choose the highest quality MB to save it as.
And there you have it!
This blog post took me hours of trial and error, learning and reading. AND lots of re-writing because explaining computer jargon is very difficult. If you’re still reading, BRAVO to you! I hope this helps you. Learning this saved me from the frustration I felt every time I had to re-look up a record. Good Luck and if you have any better ideas PLEASE share.
Remember by small and simple things are great things brought to pass.
-Tonya


Leave a Reply